We show you how to run stable diffusion locally (web UI) on a Windows Machine
So you want to install stable diffusion on a windows machine but do not have any idea where to start? Well let us help you this guide was created for complete beginners and will guide you on how to run stable diffusion on a windows pc.
We will be using Stable Diffusion webui. This guide is for complete beginners, so if you have been eager to start using stable diffusion but have not had the confidence to get started, well this guide is for you. We will guide you through the complete process. Please note if you are a fan of Midjourney then check out our other guides.
How to Install Stable Diffusion
Are you ready to begin using stable diffusion, want to create your own AI generated images/art? Well id love to tell you just click on this link download one file and begin, but sadly it’s not that simple. We are going to need to install certain files before we begin. Please ensure you read the complete guide if you are completely new to Stable Diffusion, GIT and Python.
In order to install stable diffusion on a windows machine you will need to install python, have a Nvidia graphics card compatible with stable diffusion. These are a must for running stable diffusion on a windows machine.
Before you begin the installation process, we need to make sure your computer meets the minimum requirements. This guide was created using 8gb of ram and NVIDIA GeForce GTX 1650 4GB. You don’t need to max out your setup but having a dedicated NVIDIA GPU.

8gb of Ram but it would be advised to get 16gb as some features won’t work or be limited.
Nvidia Maxwell (GTX 7XX) or newer GPU at least 2GB of VRAM
Windows 7/8/10+ – We used 10 for this guide
20GB of disk space – majority of the download space is for the model
Please be aware the above is just a guidance. Some NVIDIA cards have a hard time working. If you keep running out of VRAM ensure you have CUDA installed – command prompt “nvcc –version”. You can also reduce the dimension size of the images being created.
If you still have issues with your card, you can ask the Stable Diffusion community on reddit.
We all good, checklist complete, positive it’s compatible? Good then we can begin. Only one way to find out is to install stable diffusion and see if we get any errors. So let’s go!
Install Python on Your Windows Machine
Now if you have already installed python correctly before you can skip this step make sure it’s installed in PATH! You can check if python is currently installed by pressing the WIN key + R to bring up the run command. Type “cmd” hit enter. Now type “python –version” if a version number is displayed your version of python is correctly installed. If not, you need to install python correctly.
Download the necessary files
We first need to download python so head over to
https://www.python.org/downloads/
and download the latest version that’s suitable for your OS version.

Once your download has completed click on the .exe file and you will be greeted with the installation process.
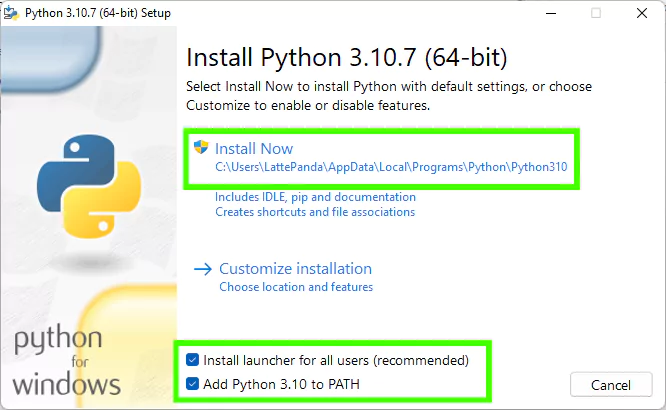
Before clicking install python “version” please do ensure that the “Add Python 3.10 to PATH” this is a must. Don’t skip this step as you may have issues down the line.
On the window below make sure you Disable the Path Length Limit.
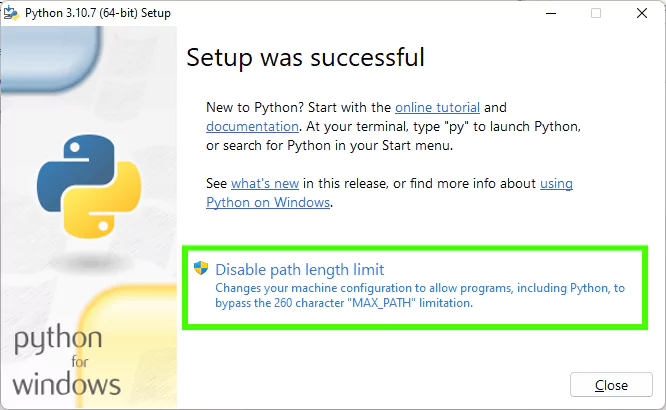
That is all there is to it! You should now have installed python correctly. Pretty simple right? Not scary at all.
To double check just do the following, press the WIN key + R to bring up the run command. Type “CMD” hit enter. Now type “python –version”. You should be told the version of python you have just installed.
If you can’t see the version chances are you did not click the add to PATH file. If needs must you can uninstall python and try again.
Please note PIP is included with python automatically now so you will not need to install PIP separately anymore. PIP is pythons package manager it’s how you install python packages to your build we will talk more about this later on.
Install GIT
We need GIT for a smooth installation of stable diffusion. We are going to use GIT bash. This also allows you to also update stable diffusion more easily if you ever need to.
Head over to https://git-scm.com/download/win and click on the download file you require.

Once the download has completed open the .exe file. Majority of the options you can keep default but when it comes to the window below ensure you click the middle option.
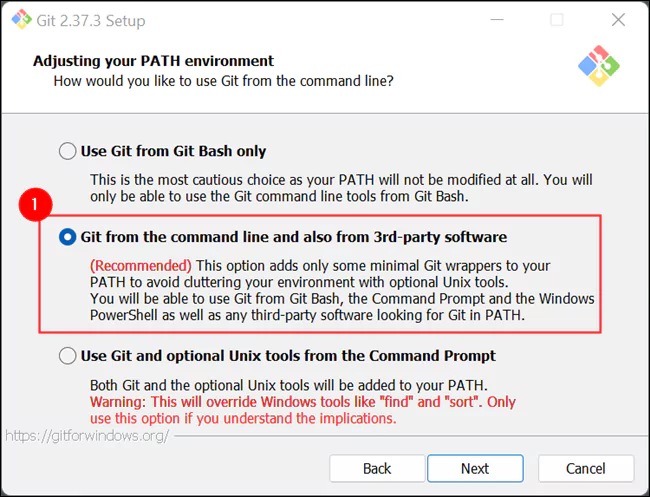
Click through the remainder of the options and wait till the install is complete. To ensure git has installed correctly open a command prompt and type:
“git –version”
if it shows the version number you are good to go.
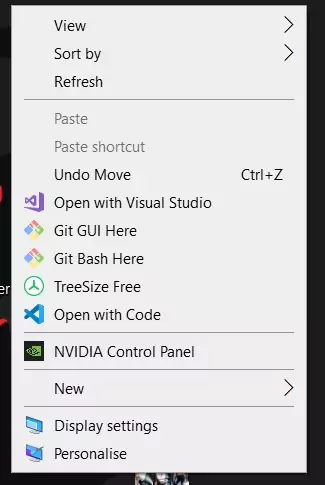
You should now be able to see new options when you right click your desktop “GIT BASH HERE” this will be important in our next step.
Installing Stable Diffusion
To install stable diffusion, we will need to download it from its GitHub repository.
The location of this file is here https://github.com/AUTOMATIC1111/stable-diffusion-webui
But wait don’t jump in feet first! we are going to do this a slightly different way by using GIT. First go to your desktop. Create a new folder called “Stable Diffusion” (or whatever you want). Open up this folder and right click. Click on GIT BASH HERE. See Below:
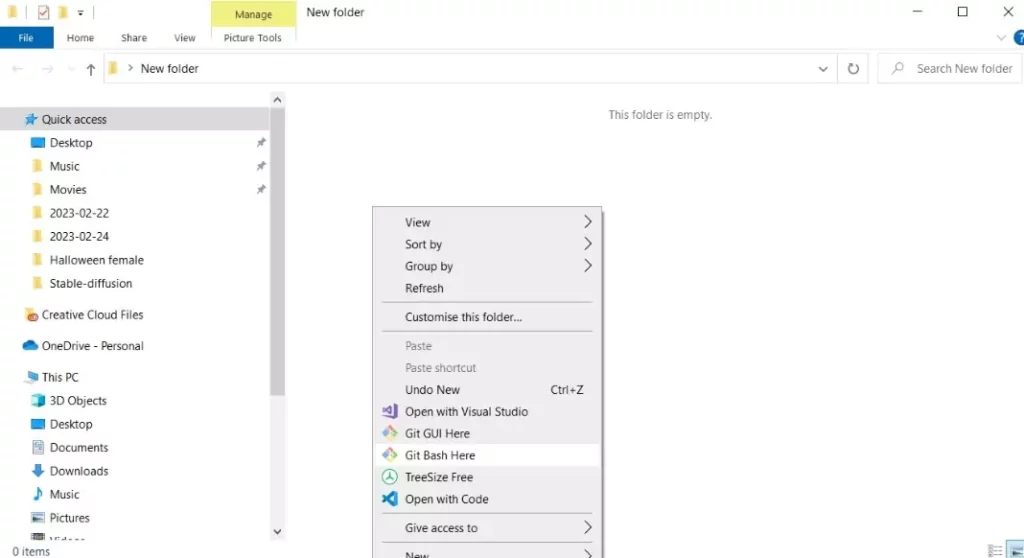
You will then be greeted with the Git Bash Screen. This is where you can paste commands.
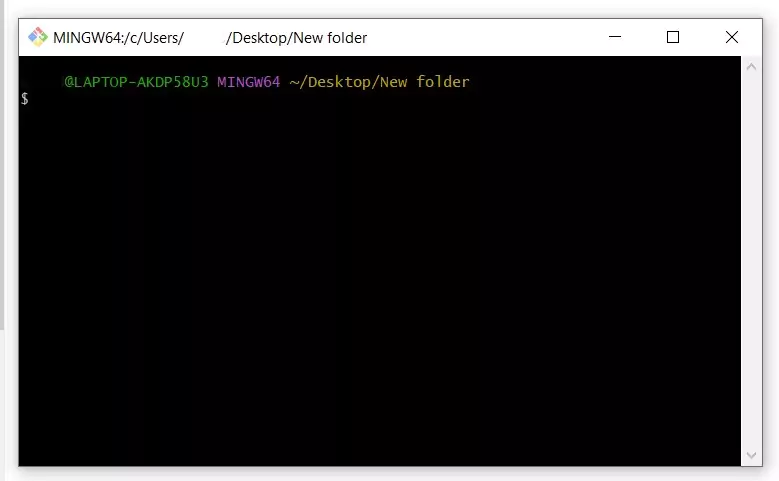
You will want to enter the following command
“git clone https://github.com/AUTOMATIC1111/stable-diffusion-webui”
This will install stable diffusion into your folder It will be named “stable-diffusion-webui”. This is your Stable Diffusion folder. Now we have stable diffusion webui installed on our system. But wait there is still more to go, we are going to need a model for stable diffusion to run with. No model no images.
Download and Install Models
In order for stable diffusion to work correctly it relies on models. These large files contain all the data required to create the images you see. There are a lot of models that can be found online. We are going to be using the following:
Stable Diffusion v1.5 – https://huggingface.co/runwayml/stable-diffusion-v1-5/resolve/main/v1-5-pruned.ckpt
You can use an updated version below
Stable Diffusion v2.1 https://huggingface.co/webui/stable-diffusion-2-1/resolve/main/v2-1_768-ema-pruned-fp16.safetensors
I personally use DreamShaper https://civitai.com/models/4384/dreamshaper it suites my style needs, but each to their own.

(Images generated using the Dreamshaper model)
There are plenty of other models you can choose from just head over to https://civitai.com please note some of the models are NSFW.
Install the Downloaded Model File
Once you have downloaded your model file (please note these are large files!) you will need to install it in your stable diffusion directory.
Desktop\”your folder name”\stable-diffusion-webui\models\Stable-diffusion
Rename your model file to “model” examples are model.safetensors or model.ckpt depending on the file extension you downloaded. This helps the program find the model you want to use.
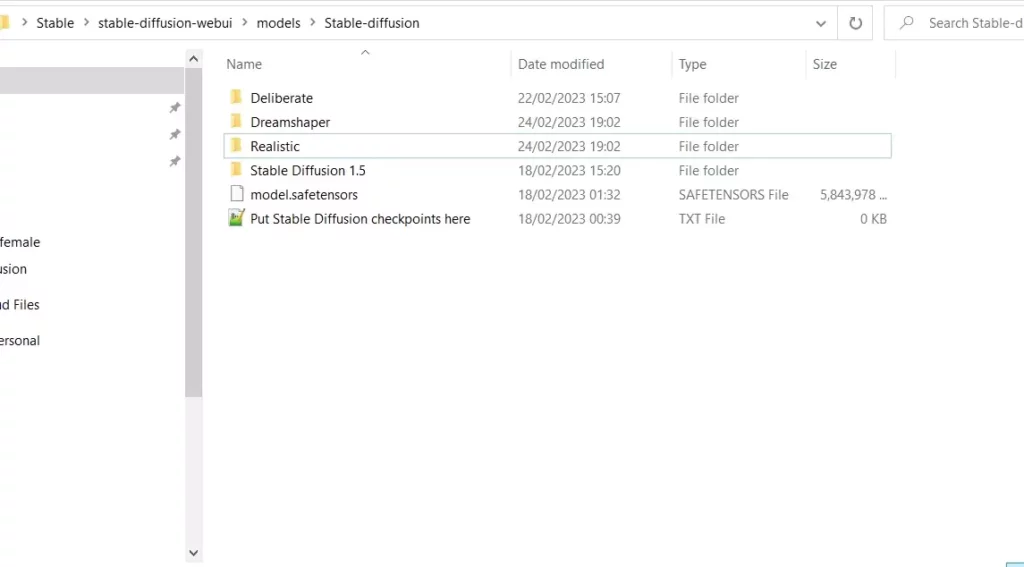
I use multiple models and swap them around when needed. Just ensure there is only one Model file in the main directory.
Final Installation Tweaks
Now this one is a bit of a tough one for some users. We are going to run Stable Diffusion for the first time. But we are going to look real closely at any errors that may popup whilst running. In some cases, you might get lucky and it will run straight away but, in most cases, you will need to install a few extra python dependencies.
We are running these checks to ensure stable diffusion works without any issues. It’s basically trial and error from here on out. Some Graphics cards are much harder to get to work than others.
We are going to head over to the stable diffusion webui folder. Open up the folder scroll down to the bottom and click on webui-user Windows Batch file. See image below.
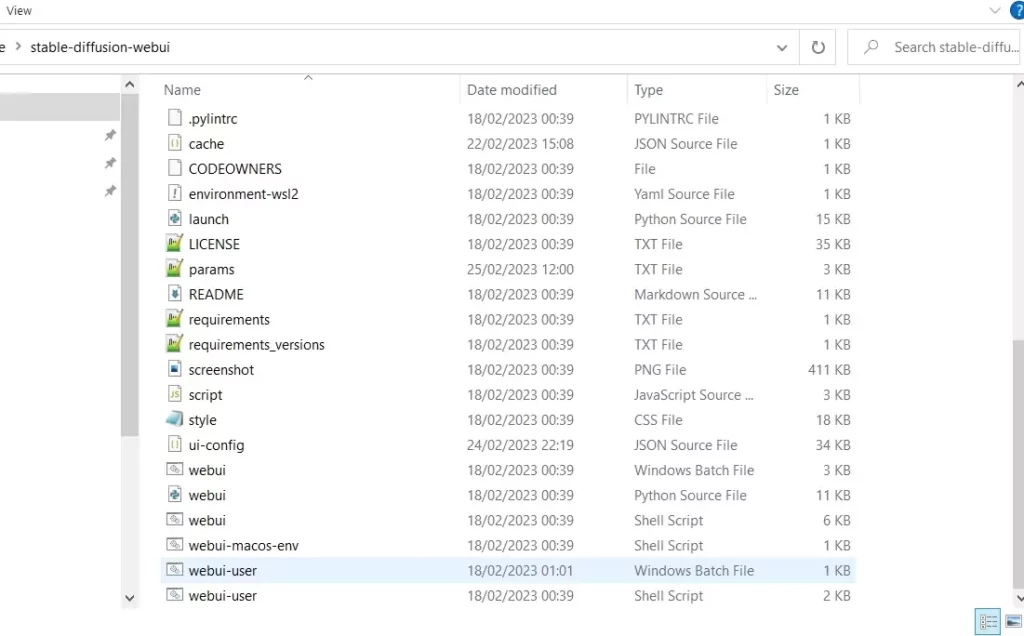
This is basically the launch file to load up stable diffusion. If it all loads up fine and has no issues you should be good to go. If not, you will want to install some missing dependency files.
Install Requirement Files
First off open a command prompt.
CD to desktop or ensure you are in the desktop directory.
CD “your folder name”/stable-diffusion-webui now we are in the stable diffusion folder. You can type DIR to see the contents.
Now we want to install the requirements needed to run stable diffusion so type the following “pip install -r requirements.txt” this will install all the files needed to run stable diffusion. Ensure there are no errors. If there are any errors like “x” is not a known command. Try PIP install “name of the command” and see if it fixes the error. Ensure your Python installation is up to date too! You may need to run Command as admin if it doesn’t work.
So, all ok? No issues, good we are good to try and launch stable diffusion again. So, head back to your folder and click on the webui—user file one more time. It should compile successfully and you will be shown a command prompt telling you where to go.
It should give you an address like the one below.
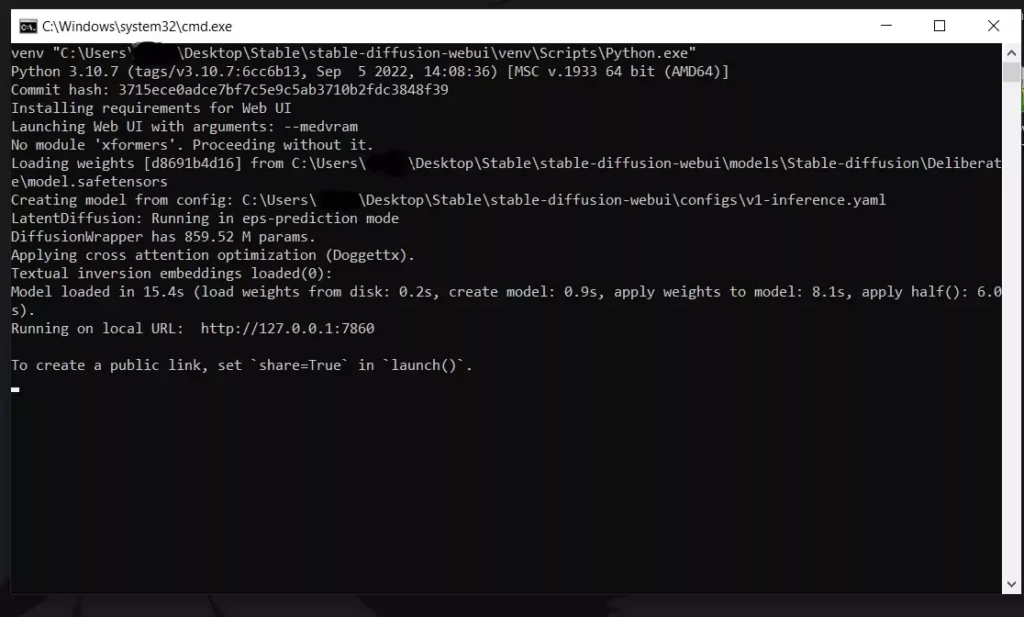
Head over to the link http://127.0.0.1:7860 open the address in your web browser and you will be greeted with the stable diffusion user interface.

If there are no errors in your command prompt except “xformers” and the stable diffusion webui has loaded similar to the image above then you have successfully installed stable diffusion on your windows machine. Now let the fun begin.
If you have issues running out of VRAM you can enter the following code to the batch file
set COMMANDLINE_ARGS=–medvram
Right click the batch file and edit with notepad. This helps to reduce the amount of VRAM used so GPUs with under 8GB of VRAM can still use stable diffusion without running out of memory.
Using Stable Diffusion
Now that you have stable diffusion running it might be a little bit daunting to use. Don’t worry I am going to show you some key features and explain the program to you to make it all a little less scary!
Please note Stable Diffusion is huge and has a lot of possibilities. For this beginner guide we are going to be just be using the text2img function. This is the most used feature of stable diffusion so as this is a beginners guide it’s a great place for people to start.
Text2Image
Text2Image is the process of using descriptive words a “prompt” to generate an image. You can quickly test Stable diffusion by just writing something easy in the prompt section. This is a great way to test how quickly the app works for you. Depending on your graphics card this can be either quick or quite slow.

Prompt: Keywords used to describe the image you want stable diffusion to create
Negative Prompt: Keywords you want stable diffusion to ignore or not add to the image.
For now, you can write what you like and hit generate and see which strange creations Stable Diffusion comes up with. In the next section I will show you a more in-depth prompt.
Example of writing prompts
When creating your own prompts, you will want to be in depth with your responses. The AI can only create what it is given. So, if you are vague with your prompts you are going to get a rather vague image. If you need help writing prompts for stable diffusion you can check out our how to create your own character in stable diffusion guide.
Prompt: RAW photo, (detailed face)+, portrait of a beautiful lady, (freckles)-, (dark makeup)-, hyperdetailed photography, soft light, head and shoulders portrait, 80mm, f22, trending on ArtStation Pixiv, high detail, sharp focus, aesthetic, 8k uhd, DSLR, intricate details, soft lighting, high quality
Negative Prompt: braids, (deformed iris, deformed pupils, semi-realistic, cgi, 3d, render, sketch, cartoon, drawing, anime)++, text, close up, cropped, out of frame, worst quality, low quality, jpeg artifacts, ugly, duplicate, morbid, mutilated, extra fingers, mutated hands, poorly drawn hands, poorly drawn face, mutation, deformed, blurry, dehydrated, bad anatomy, bad proportions, extra limbs, cloned face, disfigured, gross proportions, malformed limbs, missing arms, missing legs, extra arms, extra legs, fused fingers, too many fingers, long neck

Please note some of these prompts can come across as offensive, but what we are trying to do is be specific with stable diffusion. So, please do bare this in mind when creating a prompt.
This is the basic way of how to use the prompt system. Once you get the hang of writing prompts there are more features in the sampling section of this program. Please note depending on which model you are using it can have a huge difference in results so bare this in mind when creating prompts.
Sampling Settings
This is where things get interesting. Stable diffusion is quite complex and gives users a fair amount of scope to play around with. It’s not just the simple matter of write a prompt and get the image you want, there are plenty of things to adjust until you get the image you are looking for.
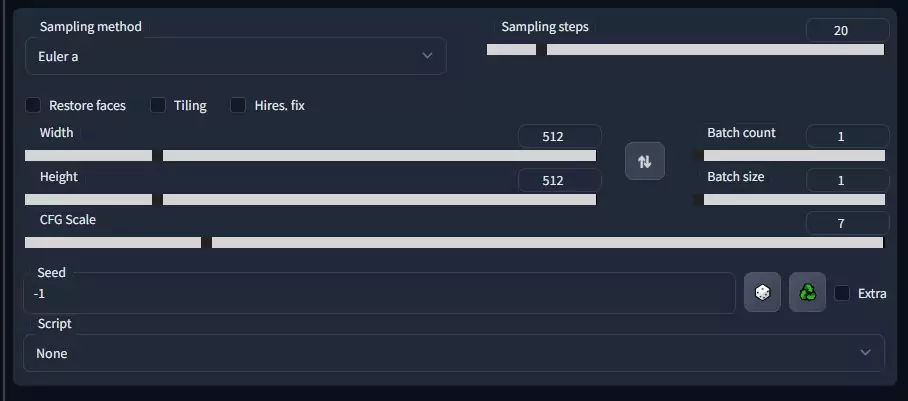
Sampling Method: Default is set to LMS I personally prefer Euler a. Some users find very little difference when changing the sampling method. Personally, I do especially when using more sampling steps. Play around with these methods and find the one that suites your model the best.
Sampling Steps: This is how many times Stable diffusions is going to improve the image. More steps are supposed to increase quality but this is not always true. Sometimes 50 steps might have a very similar appearance to 100 steps. Please note the more steps you use the longer it’s going to take to produce the image. Default is set at 20 I’d recommend 50 – 125 depending on your use case.
Restore Faces: If your faces are coming out incorrectly then you can try ticking this box and trying again.
Tiling: Looking to create a tiled image? Then this feature might just be the thing you are looking for.
Hires. Fix: This allows you to increase the dimension size of your completed image. Please note this will take up more memory so be careful when messing around with these dimensions.
CFG Scale: Simply put its how much stable diffusion follows the prompt. The higher the number the less specific, the lower the more it follows the prompt. Please note setting this too high or too low can give strange results. In most cases 7 – 12 is a reasonable ground to play around with.
Width: The width of the generated image
Height: The height of the generated Image
Batch Count: How many images will be created in total when you press generate.
Batch Size: How many images will be created at the same time. Most cases keep this to 1 or 2.
Seed: This is a debatable feature. It’s a random number that is created when using your prompt. It’s great if you want to try to replicate other prompts by using the same seed. You can play around with this by clicking the extra checkbox. It’s not important to start with and can be left at -1 until you are more comfortable using stable diffusion.
Script: This is where custom scripts are placed that you may want to use when generating your images. I won’t go into detail here as it can get quite extensive.
Stable Diffusion is an amazing piece of kit and this web ui tool makes it quite easy for anyone to use. Please be aware there are tons of features when running this program so you might want to play around with this software once you learn the basics.
Bonus Prompt List
To help you create your first few prompts here is a prompt list table. This table is just a small example of what can be achieved when creating your own prompts.
| Styles | Artists | Formats | Booster | Perspective |
| Reissuance | alphonse mucha | Pixel Art | trending on artstation | from behind |
| Impressionist | pablo picasso | Security Footage | beautiful | wide angle |
| Realism | piet mondrian | vector art | vivid | fisheye lens |
| Cubism | jackson pollock | stained glass window | professional | telephoto |
| Romanticism | mark rothko | cartoon | extremely detailed | wide angle |
| Symbolism | georges braque | 3d render | stunning | panoramic |
| Cyber Punk | andy warhol | line art | wondrous | bokeh |
| Minimalism | roy lichtenstein | pixel art | ultra high poly | lens flare |
| Anime | rené magritte | product photography | zbrush | hard lighting |
| Photorealism | frida kahlo | diagram | highly detailed | landscape |
| Fractal | dean cornwell | daguerreotype | look at that detail | drone |
| Abstract | wes anderson | screenshot from | studio lighting | on canvas |
| Gothic | frank gehry | displayed on a store mannequin | 8k | close up |
| Mannerism | saul leiter | modeling photoshoot | 4k resolution | from below |
| Low Poly | dorothea lange | cross stitched sampler | vfx | from above |
| Airbrush | terry richardson | manuscripts | rendered in unreal engine | over-the-shoulder shot |
Subject: This is the subject matter of your image. So if you would like your work to be in the style of medieval art it would be best to list this at the beginning of your prompt.
Style: This normally refers to an artist or certain style of artwork.
Format: What style of picture do you want, oil painting, sketchbook, polaroid?
Booster: This is another prompt example of adding a feature to your work. Keywords like high detail, digital art, trending on art station and even Rendered on unreal engine are all good booster prompts to add.
Perspective: This is the viewpoint of your image. Panoramic, above, below, etc.
There are 1000’s of keywords that can be used when creating your very own stable diffusion prompt. The above list is just a few that you can use. Try to use them in your image creations and see what you can generate. You can also write prompts for stable diffusion to make your characters look more realistic too.
Final Notes
We do hope you have enjoyed our guide on how to install Stable diffusion on a windows pc. Let us know in the comments below if you were successful and if so have you managed to create any cool generative AI images? Please note we do have guides to help you with using stable diffusion. Why not check out our Stable Diffusion Cheat sheet.
As mentioned before Stable Diffusion needs to be told exactly what you want to produce. Negative prompt does not mean something is bad or wrong it just means you don’t want it in your generated images. So remember this when creating prompts for stable diffusion.
Thank you for reading our guide and good luck with making some awesome AI Generated images with Stable Diffusion.


