If you have a reliable Mac (M1/M2) Then you can use AI to Create Art!

If you are new to AI generative art then you might not have heard of Stable Diffusion. Stable Diffusion is a text-to-image artificial intelligent tool that can be ran locally on a pc or laptop. As long as the laptop or pc has the recommend settings to run it.
Stable diffusion is a resource hog and requires a reasonable system to run. When it comes to mac you will need to have either a M1 or M2 in order to run stable diffusion, if you don’t you may come across problems performing even simple tasks with this tool.
Please be aware that in order to follow this guide you will need a Mac With Apple Silicon (M1 or M2) this well help speed up your image generation. It is advised to have 16GB of memory or more if you can. But please note this is going to be slower than running stable diffusion on a well equipped windows machine. If you have one of them lying around you can try installing stable diffusion on a windows machine instead.
You have a few choices when it comes to installing stable diffusion on a MAC here are your options:
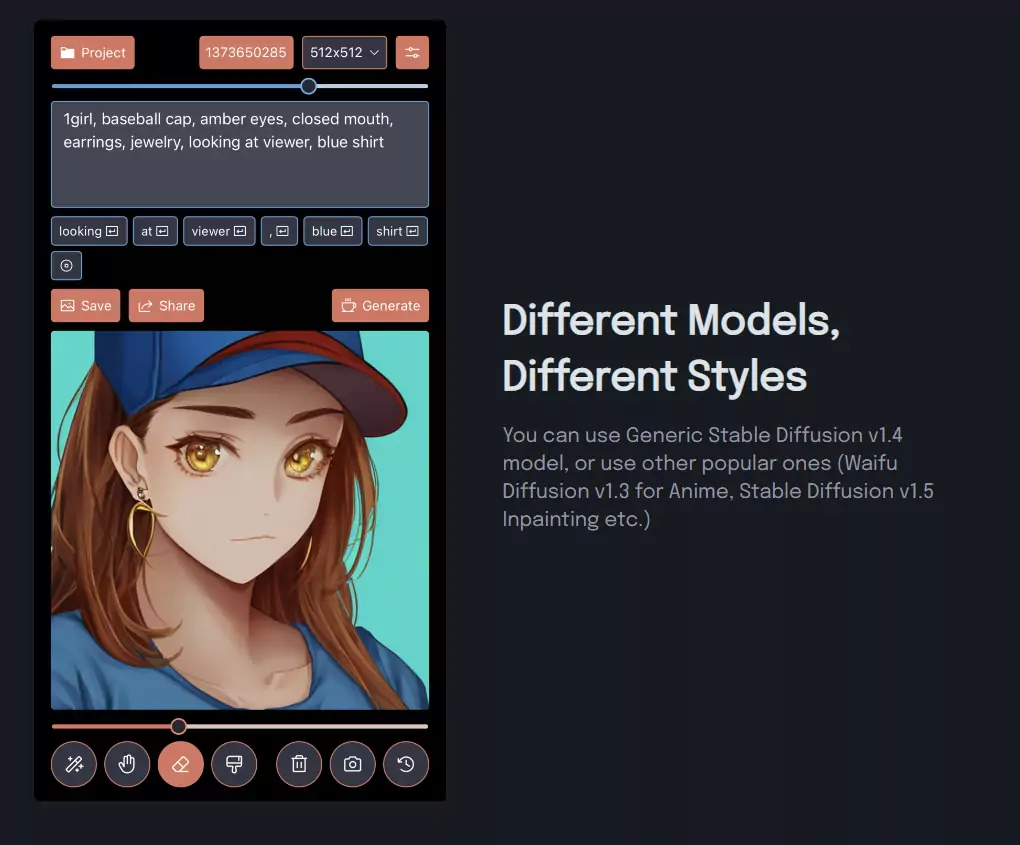
- Draw Things – This is a straight forward installation and has a wide range of features. Also supports a wide range of models. Perfect for beginners.
- Diffusers – Another app that you can easily install, not as many features and does not support many models. Worth trying if the above doesn’t work.
- DiffusionBee – Basic APP, easy to install has very limited features. It’s good to download as a test to see if your MAC Will work with stable diffusion.
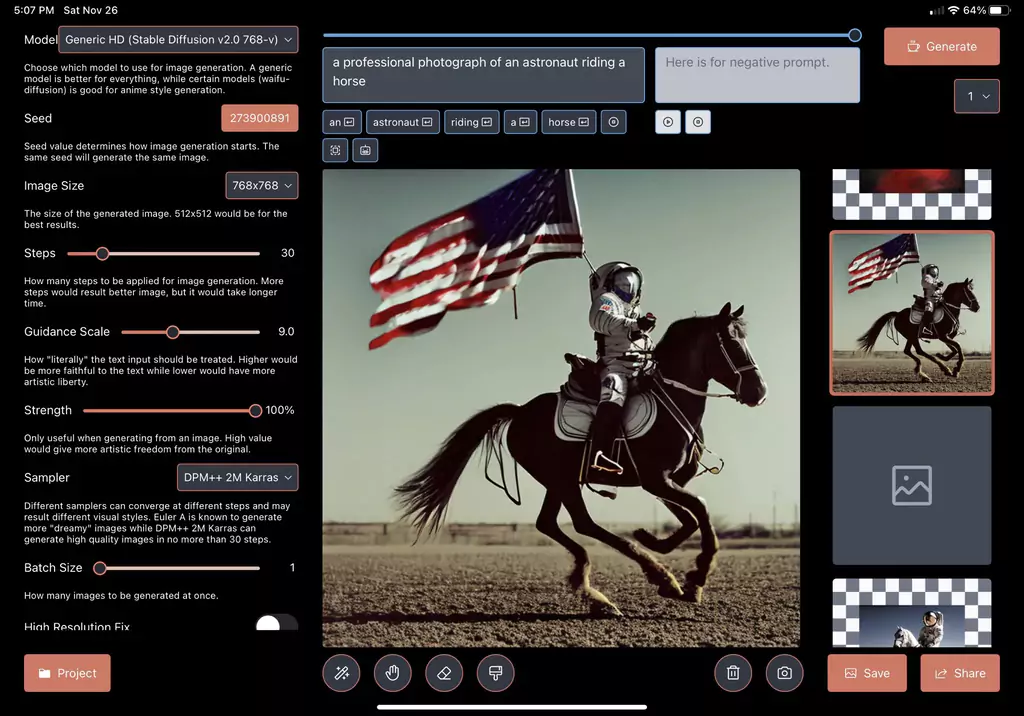
- AUTOMATIC1111 – Nothing beats this, has the most features and supports all models. The most advanced tool of stable diffusion to date. But it has one set back it’s hard to install.
Draw Things App
Install Instruction for Draw Things App for Mac
We recommend installing draw things if you are new to using stable diffusion and want a simple to use service.
Draw Things is an easy to install version of stable diffusion for the apple mac. You can install it the same way you would any other app. It supports a wide range of models and has a large portion of features. Great for beginners or those that can’t run the Automatic1111 version.
Draw things supports the following Apple products:
Draw Things app is available for iPhone XS, XS Max, Xr, 11, 11 Pro, 11 Pro Max, SE 2nd Gen, 12, 12 Mini, 12 Pro, 12 Pro Max, SE 3rd Gen, 13, 13 Mini, 13 Pro, 13 Pro Max, 14, 14 Plus, 14 Pro, 14 Pro Max, iPad Air, Mini, Pro with iOS / iPadOS 15.4 and above; M1 / M2 Mac Mini, Mac Studio, MacBook Air, MacBook Pro with macOS 12.4 and above.
As you can see it’s a pretty extensive list. We have not personal tested all of these version but you are more than welcome to try them out for us. Let us know in the comments if you have managed to get Draw things to run on your apple product.
You can check out the App Product Page to download this file.
One of the biggest benefits with using Draw thing is the fact that it supports multiple models. If you are new to all this models are what stable diffusion is trained on. So let’s say you want to create images of realistic people you would use a model that has been trained on those kind of images. You can download 100’s of models from this website here.
Another good thing is that this app also support inpainting. Inpainting is where you mask parts of your image and then ask stable diffusion to edit the masked part of the image. It is good for changing faces and removing unwanted parts of an image. It is resource heavy though, so be careful you don’t overload your system and crash it!
So what are the Pros and Cons of using the Draw Things App
Pros
When it comes to using the Draw things app for mac we find it to be quite beneficial for people new to using stable diffusion. Here are some of the benefits of using this app:
- Easy to install, seriously it’s like installing any other app on the mac. This is one of the main benefits of using this tool
- Supports a wide range of models, allowing you to create the images you want to. Instead of being restricted by the default model
- Can use inpainting
- Works on a large range of apple devices
Cons
Well we don’t think there are many cons with this one, our main concern though is that it’s limited by it’s features. So if you wanted to do more advanced things you won’t be able to. That’s why we would recommend advance users to install Automatic1111’s version. We will talk about that later.
Also it doesn’t support all models, so you might find yourself disappointed if you wanted a certain style oof artwork.
The Diffusers App
Install Instructions for The Diffusers App for Mac
Just like the above app we recommend installing Diffusers if you are new to using stable diffusion but only if you are having issues with the above app. As this app has less features, but still good to use for beginners.
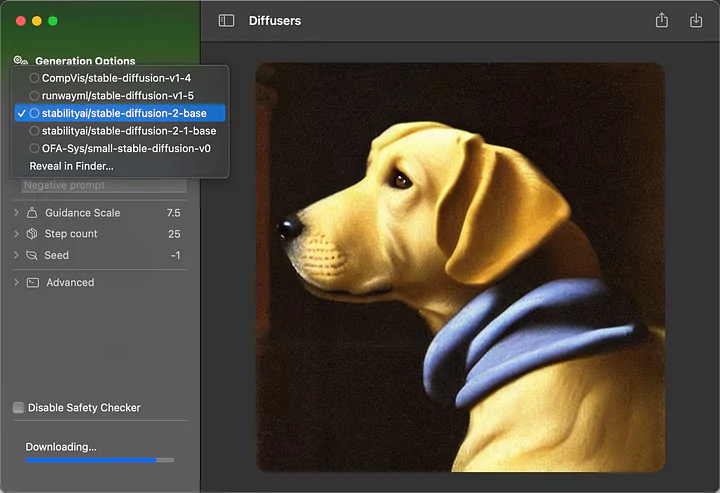
Diffusers is a Mac specific app made by Hugging Face. Hugging Face is a community and data science platform it provides a service that enables users to build, train and deploy ML models. They store Stable Diffusion models on their website.
If you would like to install diffusers you can visit the Diffusers app page but please be aware customizations and models are quite limited. So just bare this in mind when you plan on creating certain types of AI generated art.
Pros and Cons of Diffusers App
Pros
- It’s Easy to install. It’s just like installing any other app, so most people find it easy to get running.
- It’s not stuck to using just one model so it has some variation
- Lightweight
- Easy to use
Cons
- Not many features
- Limited Customizations
- Doesn’t support many models
You might want to install Diffusers if you can’t install any of the other apps or you just want something simple and easy to install, just to test out stable diffusion. It’s really up to you that’s why we give you multiple options.
——————————————————–
DiffusionBee App
Install Instructions for DiffusionBee App for Apple MAC
The most user-friendly and by far easiest method of installing Stable Diffusion on your Mac OS is to use the Diffusion Bee installer. Diffusion Bee is a graphical user interface (GUI) app that comes with a one-click installer in the form of a typical Mac binary dmg package. Here are the steps to install Stable Diffusion using Diffusion Bee:
- Go to the DiffusionBee download page and download the installer for MacOS – Apple Silicon to ensure it will run this app. A dmg file should be downloaded, please ensure this is correct and your are downloading this file from the correct website. There are some bad actors out there so ensure your download is correct.
- Double-click to run the downloaded dmg file in Finder. You will be greeted with a new window that should open up.
- Drag the DiffusionBee icon on the left to the Applications folder on the right.
That’s it! If you have completed these steps correctly tou should be able to run this version of stable diffusion on your mac OS.
How to Run DiffusionBee on Mac
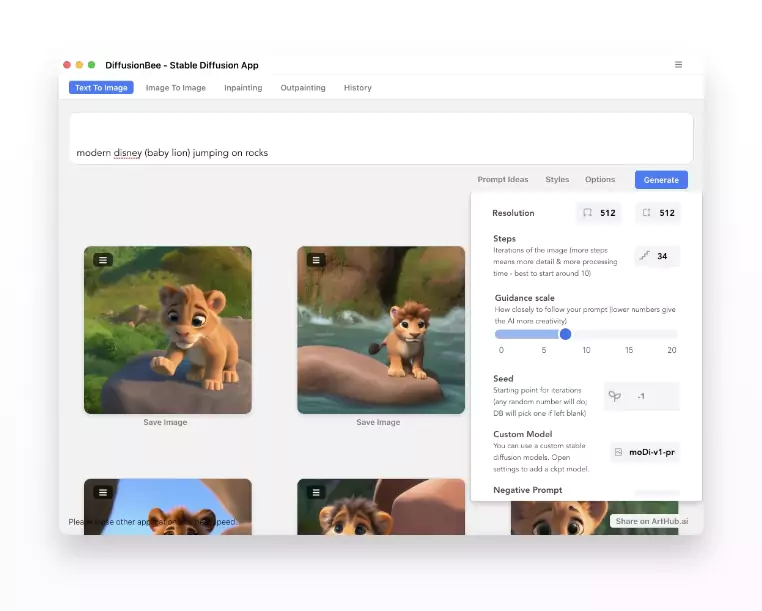
If you want to start DiffusionBee just open up spotlight search. (Press command + spacebar). Once it’s opened up Type “DiffusionBee” and press return to start the app DiffusionBee.
If this is the first time you are running this stable diffusion app for apple mac it will need to download models to start with. These models are what you are going to be using to generate your images with ai.
After the download has finished, this can take some time depending on your internet connection (models are a few GB’s in size!). You can now start using stable diffusion on your mac. Just enter a prompt and hit the generate button!
DiffusionBee has plenty of features, so is great for beginners you can play around with the negative prompt, use inpainting (replaces parts of your images) and o.ut painting (fills and increases the size of the image).
There is also more features you can edit like the CFG scale this is how relevant your image is to the prompt you have provided it. Oh and the size of the image, please note the large the image the longer it will take to produce. Also if you have little ram it might crash your system, stick to the default settings. Once you are comfortable then you can play around with them and see what works and what doesn’t work on your system.
Pros and Cons of DiffusionBee
Pros
- Installation is relatively easy
- Supports Inpainting
- Support out painting
- CFG Scale
Cons
When it comes to using DiffusionBee for beginners we don’t feel it has many cons. It’s simple and easy to use. Our only complaint is that is doesn’t support a wide range of apple products. You will need an M1 or M2 to run this stable diffusion app.
You are more than welcome to try it out though, let us know what make and model of mac you managed to run this great tool on!
AUTOMATIC1111
Install Instructions for AUTOMATIC1111 for Mac
This is basically the holy grail for stable diffusion users. It offers the most advanced tools on the market to date. Is contantly updated and can perform a wide range of functions. It is completely customizable and supports multiple models and model types. If you can manage to run this on your Mac then you sure are lucky or have deep pockets.
The others apps we have mentioned are straight forward to install, but only offer a limited amount of functionality. If you wanted to ever become and advanced users of stable diffusion you will most likely want to get hold of an advance GUI. This comes in the form of AUTOMATIC1111
All of our tutorials where you are required to use stable diffusion use this webUI tool. It just works and does a bloody good job.
Install AUTOMATIC1111 on Mac
In order for you to start the installation process you are going to want to Install Homebrew. Homebrew is basically a package manager but for MAC. It allows you to install packages directly onto your mac so great for download content off of github!
You can install homebrew through the terminal app. Type the following command and then hit enter/return.
/bin/bash -c "$(curl -fsSL https://raw.githubusercontent.com/Homebrew/install/HEAD/install.sh)"Hang on, we are not finshed yet!
You need to install a few more packages in order to get automatic to work. Open a new terminal and run the following command
brew install cmake protobuf rust python@3.10 git wgetPython is the boss when it comes to machine learning. This is what stable diffusion uses in order to generate it’s AI images. Without it, we would not be able to use this amazing piece of technology.
Almost there!
You now need to clone the AUTOMATIC1111 repository. You can do this by running the following git command in your terminal app:
git clone https://github.com/AUTOMATIC1111/stable-diffusion-webuiNow you might have noticed that a new folder has been created called stable-diffusion-webui under your home directory. This is the default folder for your stable diffusion installation. Get familiar with this folder as you will interact with it alot if you want to become an advanced generative AI artist.
But Wait There Is More!
In order for you to run stable diffusion you require the use of models. Models are trained on images, they help stable diffusion generate the images it dos. You can download v1.5 from this download link.
Once you have downloaded the model fil place it in the folder “stable-diffusion-webui/models/Stable-diffusion” . This is the stable diffusion folder you created earlier, can you remember where it is located? if not use mac’s finder app to locate it! Once you have write it down!
Now that you have installed stable diffusion it’s time to run it, good luck!
How to Run AUTOMATIC1111 on Mac
Now this is pretty straight forward just one command and a click of a link and you are ready to go. The hard part is if you come across any errors!
In order to run Automatic1111 on the apple mac for the first time you will need to enter the following command in your a terminal: “cd ~/stable-diffusion-webui;./webui.sh” This will boot up the web UI
If this is the first time you are running this app it might take some time. Just be patient it is locating all the files, models and making sure everything is installed correctly.
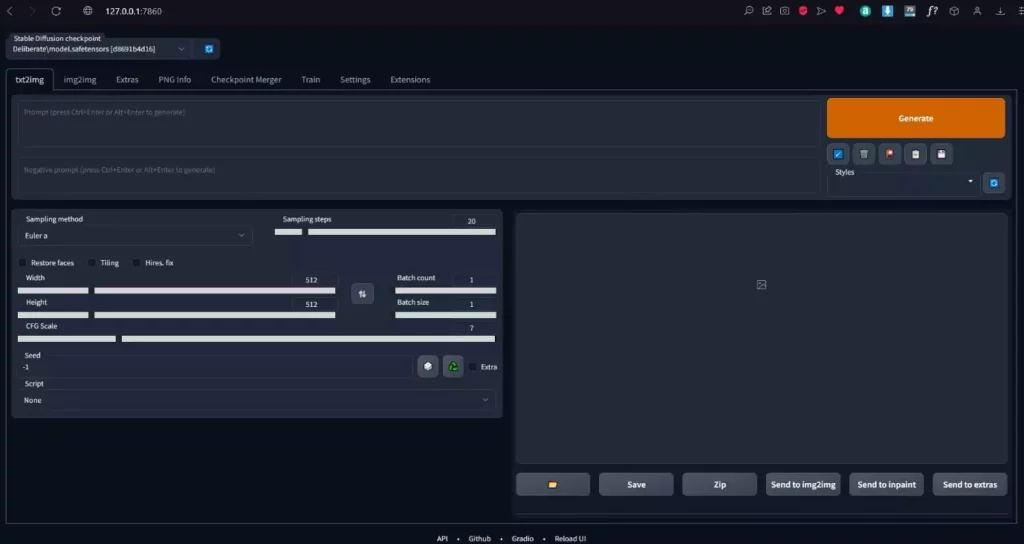
Once this has finished it will tell you to visit a web address. You can do this in your browser head over to the “http://127.0.0.1:7860/” this is the same address for all installations. Make sure you have entered it correctly.
You should now be greeted with the AUTOMATIC1111 GUI. Here you can put in a prompt and hit generate to test if the GUI works. It should generate an image for you, that is all there is to it. The rest is playing around with the settings and features. If you get stuck and want to know more you can either check out the reddit subreddit or check out some more of our guides on how to use stable diffusion.
When you have finished all you need to do is close you terminal. This will shut down the web app, you can close down your browser window too as it won’t work anymore. In order to start this program up again repeat the terminal command as you did at the beginning of this section.
Pros and Cons of AUTOMATIC1111
Pros
The main reason people download this version for their macs is because it supports the most features. It is constantly updated and a lot of big names within generative AI use it. It really is the first step in becoming successful at creating AI generated art and even video!
Cons
- Can be difficult to install
- Requires a power mac
- Can have issues that take a while to fix
Common issues when installing AUTOMATIC1111 on Mac
Here is small list of common problems using this app on the mac:
RuntimeError: Cannot add middleware after an application has started
9/10 times this is because of an outdated Fastapi package try the following command in a terminal:
./venv/bin/python -m pip install –upgrade fastapi
RuntimeError: “LayerNormKernelImpl” not implemented for ‘Half’
You can edit the settings in the webui by going to settings > stable diffusion and ticking the no half setting or you can type the following to start the web ui:
./webui.sh –precision full –no-half
Any issues with “out of memory”
There are two solution to this issue either upgrade your MAC or reduce the settings of what you are trying to do. Increase the size of an image or “fixing” faces is going to use up more memory. Bare this in mind when creating your own images with stable diffusion.
End Notes
We do hope you have now successfully installed stable diffusion on your mac and are creating some amazing pieces of AI generative art. Did this guide help you? if so why not leave your comments below we would love to hear from you.